

This post may contain affiliate links. If you buy through them, we may earn a small commission at no extra cost to you. Learn more
Here is how to organize Tupperware so it stays organized: take every container out, match each base to its lid, get rid of anything without a partner, then nest the bases by shape and store the lids standing up in a separate rack or bin right next to them. Give the whole collection one home, a drawer or a single cabinet shelf, and set a limit so it never outgrows that space.
That is the short version. Below you will find the step-by-step method, Tupperware organization ideas for drawers, cabinets and tiny kitchens, how to decide whether lids go on or off, the mistakes that make the avalanche come back, and a quick weekly reset. The same method works for glass meal-prep containers, deli containers and any other food storage containers you own.
Why Food Containers Turn Into an Avalanche
Food containers are awkward to store. They come in different shapes, the lids rarely nest, and they leave the cabinet in ones and twos (lunches, leftovers sent home with guests) and come back at random. Most collections also grow without a plan: a new set gets added before the old one leaves, takeout containers pile up, and orphan lids hang around “just in case.”
The fix is less about clever storage and more about three decisions: how many containers you keep, which shapes you keep, and where the lids live. Make those once and the storage part gets easy.
How to Organize Tupperware in 7 Steps
1. Empty everything and gather the strays
Pull every container and lid out of the cabinet, drawer, dish rack and dishwasher, and check the fridge, lunch bags and car. Put it all on the counter or table so you can see the full collection at once. It usually looks like more than you expected, and that is useful information.
2. Match every lid to a base
Snap or press each lid onto a base. Anything left over goes in two piles: lids without a base and bases without a lid. Unless a base without a lid has a clear job (a scoop, a bin for small items, a pet food bowl), let both piles go. Recycle them where your local program accepts that type of plastic.
3. Declutter what you do not use
Now edit the matched sets. Let go of containers that are cracked, warped, badly stained, hold smells, or have lids that no longer seal. Then look at quantity: keep roughly what you would fill on a busy leftovers or meal-prep week, plus a few spares. Takeout and deli containers can stay, but give them a small fixed spot and a firm number. If the rest of the kitchen needs the same treatment, our 50-things decluttering checklist covers the usual suspects.
4. Standardize shapes going forward
Mixed shapes are what make nesting impossible. When you replace containers, stick to one or two shapes (all rectangles, or rectangles plus rounds) from a single line so the bases nest and several sizes share the same lid. You do not need to replace a working collection all at once; just stop adding odd one-offs.
5. Pick one home for the whole collection
Choose a single drawer, cabinet shelf or bin near where you pack leftovers, usually between the fridge and the dishwasher. Measure the width, depth and height of the opening before you buy any organizer. Keeping everything in one place means you always know where to look and where to put things back.
6. Nest the bases by shape and size
Stack each shape largest to smallest, with no lids on, so a tall stack of rectangles takes up the footprint of the largest container. Line the stacks up in rows with the shapes you use most at the front. Glass is heavy, so keep glass stacks low (a bottom drawer or lower shelf) and do not nest glass so high that the top pieces wobble.
7. Stand the lids upright in a lid organizer and label the spot
Lids stored flat slide around and bury each other. Stand them up on edge like files, sorted by size or shape, in a divided rack, a narrow bin or a dish-drying rack you already own. A bamboo lid organizer with adjustable dividers does exactly this: each lid stands in a slot so you can flip through and pull the one you need. Add simple labels (for example “small round” and “large rectangle”) so everyone in the house can put things back.
Tupperware Organization Ideas for Every Kitchen
Where the collection lives decides which setup works best. Pick the idea that matches your space.
A deep kitchen drawer (the easiest Tupperware drawer organizer setup)
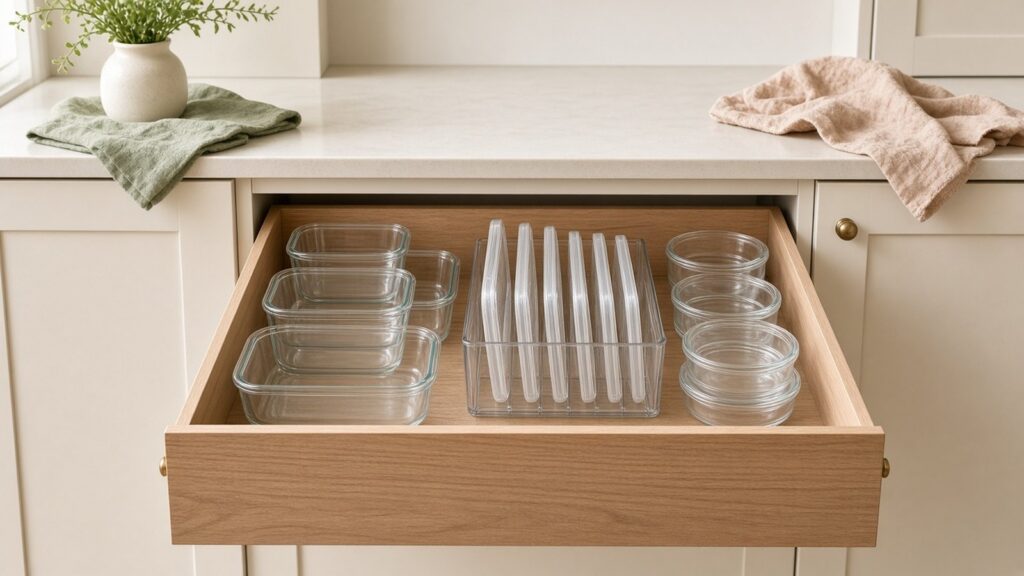
A deep drawer is the easiest place to keep food storage containers because you look down at everything at once. Run the nested stacks front to back in rows and put a lid rack along one side. Adjustable drawer dividers or a few shoebox-sized bins keep the rows from shifting every time the drawer opens. This is the setup in the photo at the top of this post.
A lower cabinet with a pull-out
In a base cabinet, containers at the back are out of sight and out of reach. A sliding drawer fixes that: everything rolls out to you. If you rent or would rather not drill, a no-drill pull-out cabinet drawer that installs with adhesive can turn a cabinet shelf into a drawer. Put the nested stacks in it and stand the lids in a bin beside them. Measure the clear opening of the cabinet, including hinges and any face frame, before you choose a size.
An upper cabinet or shallow shelf
On a high shelf, use one open-front bin per shape so you can pull a whole stack down with one hand instead of balancing loose containers. Keep the everyday sizes on the lowest shelf you can reach without a step stool and spares or seasonal pieces above.
A tiny kitchen with no spare cabinet
Give the collection one lidded bin or basket and store it on a pantry shelf, on top of the fridge or in a nearby closet, with only a few everyday containers in the kitchen itself. Our guide on how to organize a small pantry without shelves has more freestanding options that work well for containers too. One place to avoid: under the sink, which is better kept for cleaning supplies, as covered in our under-sink kitchen organization ideas.
How to Organize Food Storage Containers: Lids On or Off?
Both methods work. The right one depends on your space and on how often you grab containers.
- Lids off, bases nested (best for most kitchens). Takes the least space and lets containers dry fully, which helps prevent musty smells. You just need a dedicated lid organizer so lids do not get lost.
- Lids on, stacked as sets (best for glass meal-prep sets). Grab-and-go with no matching, but it takes much more space. Works well for a small set of identical containers you use every day; leave the lid resting loosely or make sure everything is completely dry first.
- Mixed. Nest most of the collection with lids separate, and keep two or three lunch containers assembled at the front for the morning rush.
Keep It Organized: A 5-Minute Weekly Reset
Tupperware organization falls apart slowly, one container at a time. A short reset once a week keeps it working:
- Collect strays from the fridge, dish rack, lunch bags and office.
- Match lids, then re-nest the bases and refile the lids.
- Toss anything that cracked, warped or lost its partner this week.
- Use the one-in, one-out rule: when a new container or takeout tub comes home, one leaves.
Big cooking weeks are the real test. Before a holiday meal, clear the container drawer and check that you have enough lidded sets ready; our Thanksgiving hosting checklist includes a short section on storing leftovers in shallow containers.
Common Mistakes to Avoid
- Buying organizers before decluttering. You end up organizing containers you were about to throw away. Edit first, then measure, then buy.
- Keeping orphan lids “just in case.” The missing base rarely turns up. Let them go.
- Storing lids flat in a pile. They slide to the back and hide each other. Stand them upright.
- Splitting the collection across the kitchen. Containers in three different cabinets mean you never know what you have.
- Stacking glass too high. Heavy stacks are hard to lift and easy to chip. Keep glass low and in short stacks.
- Letting takeout containers multiply. Give them a small fixed bin; when it is full, recycle the extras.
FAQ
How do you store Tupperware lids so they don’t fall over?
Stand them on edge, sorted by size, in something with dividers: a lid organizer, a divided rack, a narrow bin or a plate rack. The dividers hold each lid upright and let you flip through them like files. Put the largest lids at the back so the smaller ones stay visible.
Should you store Tupperware with the lids on?
It is usually better to store bases nested and lids separately, because it saves a lot of space and lets everything dry completely. Keeping lids on makes sense for a small set of identical containers you grab daily, as long as they are fully dry before you close them.
How do I organize Tupperware in a deep drawer?
Nest each shape largest to smallest, arrange the stacks in rows front to back, and stand the lids upright in a rack along one side. Use adjustable dividers or bins so the rows do not slide when you open and close the drawer, and keep the shapes you use most at the front.
How many food storage containers do you really need?
There is no single number. A practical guide is the number you fill during a busy cooking or meal-prep week, plus a few spares for leftovers and lunches. If containers are still sitting unused in the cabinet after a few weeks, you have more than you need.
One Home, Matched Lids, Done
Organizing Tupperware for good comes down to a few habits: match every lid, keep only what fits your space, nest the bases, stand the lids upright and give the whole collection one home. Do the full reset once, spend five minutes on it each week, and the cabinet avalanche stays gone. Next, take the same approach to the rest of your pantry with our small pantry guide.



Leave a Reply